
How to call the Rewiring America REM API from React
Rewiring America is sharing its data and designing models — and offering tutorials on how to incorporate them into your websites, research, and more.
Over the past two years, Rewiring America has been assembling data and designing models around the benefits of electrification. But we don’t want to keep all of this exciting work to ourselves. So we’ve decided to share it with the world through our API.
This is part two of a series of articles illustrating how easily you can incorporate the Residential Electrification Model (REM) API to your website, research, and more. You can read the first post here.
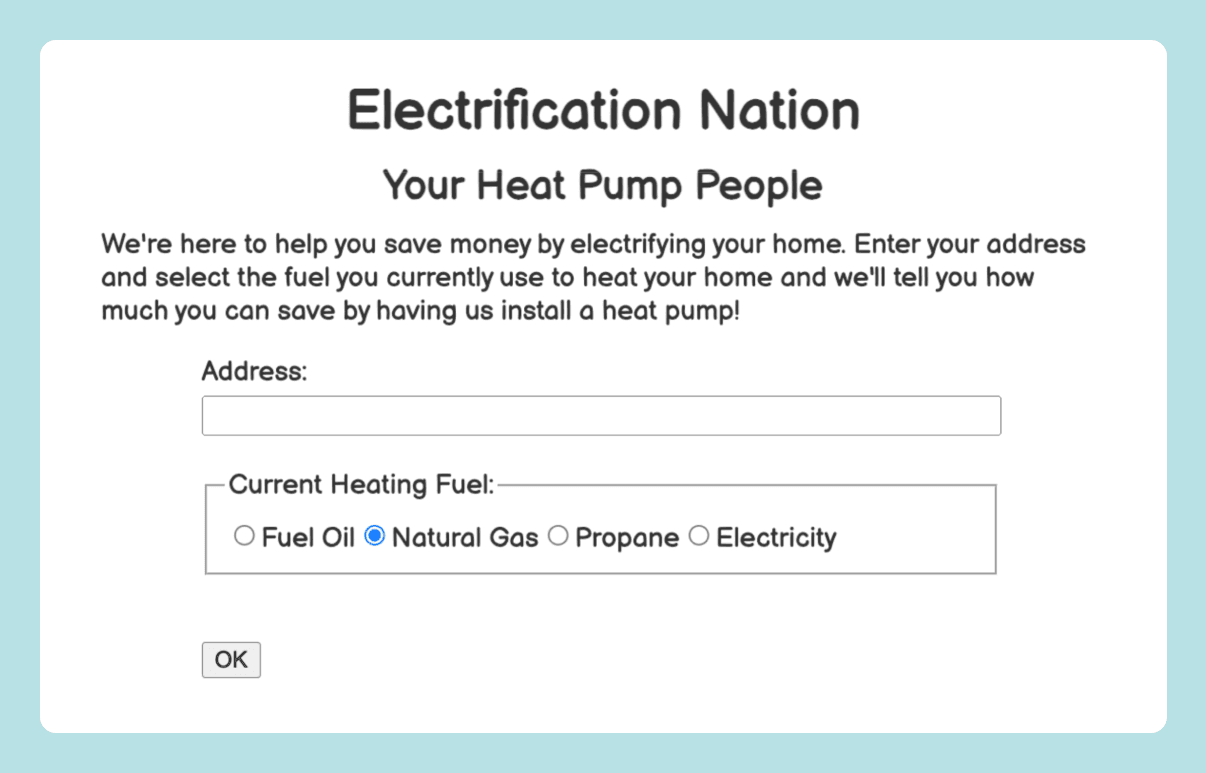
In this post, we will walk through building the various components of the form below using React, which many developers prefer for browser portability, testing, and reusability of components, since it can create native user interfaces, not just web-based ones.
Adding an interactive form
In the first post of this series, we walked you through building a website for a hypothetical heat pump installer called Electrification Nation and adding the REM API quickly and simply, with HTML and JavaScript.
In this post, we’ll do that again, but using React, which many developers prefer. We wanted to add an interactive form to the website where potential customers could enter their personal info and current heating fuel in order to get an accurate estimate on how much they could save on bills by switching to a heat pump.
If you would like to see the whole guide at once and try it out for yourself, you can find the full source in our GitHub repository.
If you are not familiar with React and would like to learn the basics, we suggest you have a look at the React tic-tac-toe tutorial. Once you have gone through it and understand the concepts introduced there, you will be ready for everything you will encounter in this post.
Getting started with React
Like most canonical React sites, our code exists primarily in two directories, src/ and public/. The former has our main react code in App.js and some supporting material like our CSS file. The latter has the outer shell of our page in a file called index.html.
Let’s start with App.js. It begins with some imports that we will see in use as we work through the file.
import { useState } from 'react';
import './styles.css';


import axios from "axios";
The first is from React so we can manage states in our code. The second is our style sheet, and the third is axios, a promise-based HTTP Client for node.js and the browser.
App.js ends with a function App() that returns the core structure of our web application. It looks like this:
export default function App() {
   return (
       <>
           <div id="titlebar">
               <h1 id="title">
                   Electrification Nation
               </h1>
               <h2 id="subtitle">Your Heat Pump People</h2>
           </div>
           <div id="content">
               <div>
                   We're here to help you save money by electrifying your home. Enter your address and select the fuel you
                   currently use to heat your home and we'll tell you how much you can save by having us install a heat pump!
               </div>
               <AddressForm>
               </AddressForm>
           </div>
       </>
   );
}
You can see that it returns a block of templatized HTML that contains the title and the paragraph of text we want at the top of the page. It looks a lot like the raw HTML in our first version of the site in the prior post. But instead of ending with a form, it has a special tag <AddressForm>. This tag represents the component that is going to do the work.
The AddressForm component is also defined in App.js. It is in the form of a function AddressForm() that begins like this:
function AddressForm() {
   const [address, setAddress] = useState("");
   const [currentFuel, setCurrentFuel] = useState("natural_gas");
   const [savings, setSavings] = useState("")
   const [hidden, setHidden] = useState(true)
   ...
These useState calls create states that can be inserted where we need them and shared among components as needed to make our site perform as we would like it to.
The next few lines of AddressForm set up some constants we will need to call the REM API.
   const upgrade = 'hvac__heat_pump_seer24_hspf13'


   // This is the URL for the REM API.
   const remApiURL = "https://api.rewiringamerica.org/api/v1/rem/address"


   // If you don't have an API key, please register at
   // https://rewiring.link/api-signup to get one.
   const apiKey = "INSERT_YOUR_API_KEY_HERE"
The upgrade is one of the upgrades the API supports. It represents upgrading to a high-efficiency heat pump with electric backup. There are a wide range of upgrade options that our API supports, such as adding a heat pump, weatherizing the home, electrifying the whole home, and other options, which you can see in the REM API documentation. We could expose all of the options to the user, like we did for current heating fuel, but we chose to focus on one upgrade as a hypothetical demo, because it's the simplest interface, and would work in cases where a local HVAC installer might want to illustrate the benefits of the most common system for households in their area.
The next constant is the URL to the API. Finally, there is a constant for an API key. As we will see in the next post, storing your API key inline in your code like this is not the best idea. It works, but it leaves your key exposed to others who might want to use it maliciously against you and/or Rewiring America. We’ll talk more about securing your key, and any keys you use for any of a variety of other APIs you call, in our next post. But for the sake of this example, we’ll just paste our key inline.
Now that we have what we need to call the API, we need the actual form that a user will type their address into. That is what we return at the end of the AddressForm() function. It looks like this:
return (
   <>
       <div id="mainform">
           <form onSubmit={handleSubmit}>
               <label>
                   <p className="label">
                       Address:
                   </p>
                   <input
                       type="text"
                       id="address"
                       value={address}
                       onChange={
                           e => {
                               setAddress(e.target.value)
                               setHidden(true)
                           }
                       }
                   />
               </label>
               <label>
                   <p className="label">
                   Current Heating Fuel:
                   </p>
                   <input type="radio" name="fuel" value="fuel_oil" onChange={onFuelChange} />
                   Fuel Oil
                   <input type="radio" name="fuel" value="natural_gas" onChange={onFuelChange} defaultChecked={true} />
                   Natural Gas
                   <input type="radio" name="fuel" value="propane" onChange={onFuelChange} />
                   Propane
                   <input type="radio" name="fuel" value="electricity" onChange={onFuelChange} />
                   Electricity
               </label>
               <br/><br/>
               <label>
                   <input type="submit" value="OK"/>
               </label>
           </form>
       </div>
       <div id="results" hidden={hidden}>
           <p>Expected annual savings: <span id="savings">{savings}</span></p>
           <p>Call us at 1-800-LEC-TRIC to get your job started today!</p>
       </div>
   </>
);
We can recognize most of this because it looks just like the static HTML in our last post. But there are a few additions and differences. First, we now have an onChange= in each of the fuel type radio buttons. So any time the user clicks to choose a different fuel type, something will happen. That something is as follows:
const onFuelChange = (event) => {
   setCurrentFuel(event.target.value)
   setHidden(true)
}
It sets the current fuel state that we defined earlier, and it changes the hidden state to true. We can see at the bottom of the block returned above that the <div id=”results”> tag has the attribute hidden={hidden}, which references the state that onFuelChange sets. So whenever the user chooses a different fuel, the results will be hidden, because they no longer apply to the newly selected fuel. This is a nice little thing that we could have done on the pure HTML/JavaScript version of the site but didn’t. In React, it was a little easier to do with a state.
The other difference about this version of the form is that it has an onSubmit={handleSubmit} argument. We put it on the form, not just the OK button like in the previous version of the site. This way the form can be submitted either by hitting the OK button or by hitting return in the address field.
Now let’s look at what happens when we submit the form. The event handler is as follows:
const handleSubmit = (event) => {
   event.preventDefault();


   axios
       .get(
           remApiURL,
           {
               params: {address: address, heating_fuel: currentFuel, upgrade: upgrade},
               headers: {Authorization: "Bearer " + apiKey}
           }
       )
       .then(
           (response) => {
               const rawSavings = -Number(response.data.fuel_results.total.delta.cost.mean.value)
               const roundedSavings = (Math.round(rawSavings * 100) / 100).toFixed(2);
               const expectedSavings = "$" + roundedSavings


               setSavings(expectedSavings)
               setHidden(false)
           }
       )
};
The main body of the function starts with a call to axios.get. We use axios to make a call to the REM API using the address and current fuel state selected by the form and the hard-wired upgrade. Once we parse out the return value of the API call and set it back into the expectedSavings state, we unhide the results part of the page.
Trying it out
There are a few other odds and ends required to make the full React site work, like public/index.html and the style sheet style.css. We won’t go into detail on these, because they don’t do anything particularly interesting that isn’t found in almost any other React web app.
If you would like to look at all of this, and try the code out for yourself, you can clone or fork the repository where we keep all our Rewiring America API demo code. It is https://github.com/rewiringamerica/api_demos. Once you check it out, you can go into the react directory and, assuming you have node installed, do
npm install
npm run start
to install dependencies and start the server.
Please continue to watch this space for another post covering how to move this site into Next.js and how to use the GCP Secret Manager to protect your API Key.
If you have questions, comments, or suggestions, or if you find a bug in any of the code above, please start a discussion or open an issue in the https://github.com/rewiringamerica/api_demos GitHub repository where it is hosted. You can also find additional examples of how to use the Rewiring America API in that project.
Check out our other guides on using the Rewiring America API