Using the Rewiring America REM API on your website
Rewiring America is sharing its data and designing models and offering tutorials on how to incorporate them into your websites, research, and more.
Over the past two years, Rewiring America has been assembling data and designing models around the benefits of electrification. But we don’t want to keep all of this exciting work to ourselves. So we’ve decided to share it with the world through our API.
This is part one of a series of articles illustrating how easily you can incorporate the Rewiring America API into your website, research and more.
In this post, we’ll show you how to add the Residential Electrification Model (REM) API to a website quickly and simply, using HTML and JavaScript.
About the REM API
Rewiring America has built a system to accurately predict savings from electrification — by collecting a large database of housing characteristics and fuel costs from around the country, and running physics-based simulations to determine how different housing upgrades affect fuel usage, carbon emissions, and costs for consumers. We layered all of that with a series of machine learning models we built to predict how electrification can lower costs, improve health, and lower carbon emissions.
Our Application Programming Interface (API) allows other computers running a variety of applications, from web servers to research notebooks, to reach out to our computers, ask the models they run questions about electrification, and get answers back quickly.
Although it took us a lot of data and sophisticated machine learning to build this system, it’s not hard for you to integrate it onto your website in an interactive way. If you are a researcher, data scientist, web developer, or web designer, most of this code will probably already be familiar to you. We hope that having this working example will inspire you to get started.
How it works
Using a provided address in the U.S., Rewiring America’s Residential Electrification Model API first queries a large database of homes that we’ve assembled. This database contains data such as home age, size, construction material, and much more. We don't know all of the properties needed to get a good estimate of energy consumption, so we perform a Monte Carlo simulation over sample homes chosen from a conditional probability distribution based on the properties that we do know. We then predict the energy consumption for each sample building using a machine learning-based surrogate model, trained on EnergyPlus simulations.
The API returns data on the estimated use of several fuels (electricity, natural gas, fuel oil, and propane) before and after the upgrade. Estimates include the mean, median, and 20th and 80th percentiles from the Monte Carlo simulation. The API also identifies the rates associated with delivering those fuels to the home and the emissions factors (how much carbon is generated) per unit of each fuel. All of this is returned to the caller in a well-defined JSON format.
In the example we’ll walk you through in this post, we’ll show you how to capture an address and the current heating fuel used at that address, and return the estimated annual savings that residents could expect if they were to install an electric heat pump.
Getting started
We’ll start with a hypothetical scenario of a heat pump installer called Electrification Nation, which has a basic website with their contact information and some information about heat pumps. Now we’re going to add a form where potential customers can enter their address and the current heating fuel they use and get an estimate of how much they could save on their annual utility bills if they were to switch to a heat pump.
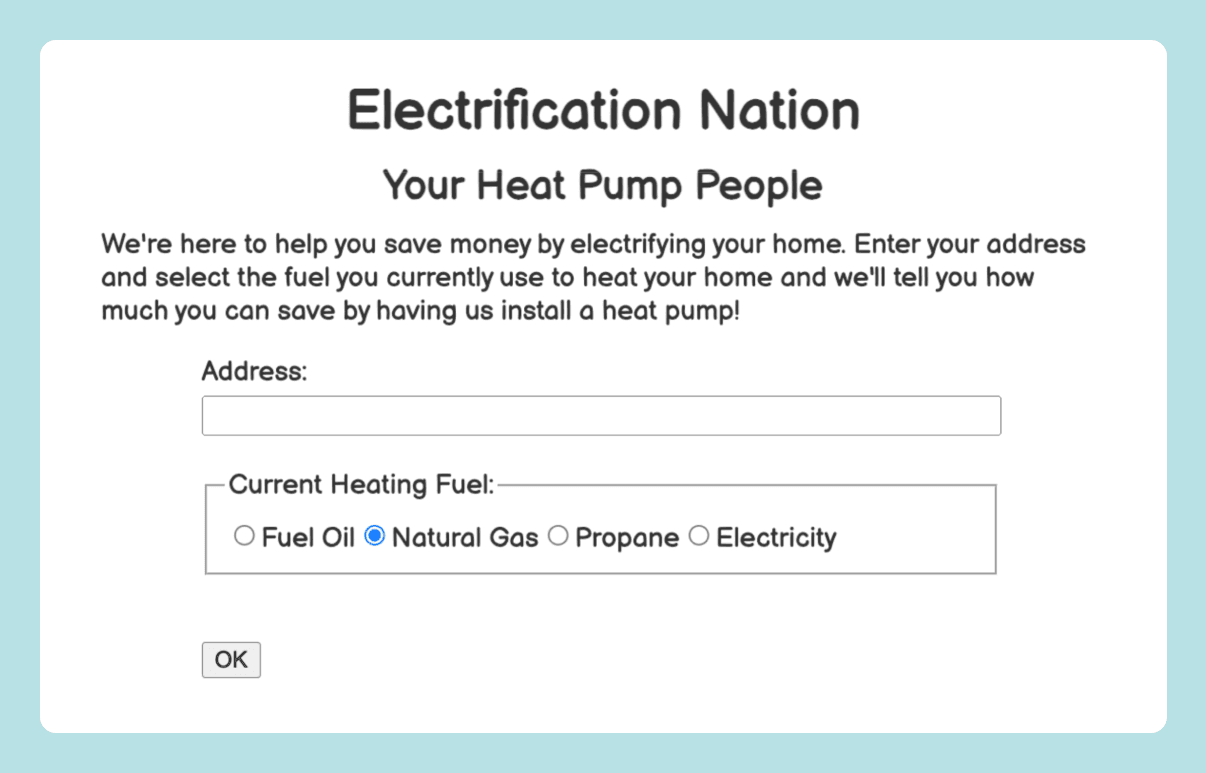
Here’s a wireframe of the Electrification Nation website as it might look before we add the REM API:

It’s barebones, just name, mission statement, and contact info. Would-be customers would have to pick up a phone and make a call to get any information about what buying a heat pump could do for them and their home. However, let’s say instead of waiting for a call, Electrification Nation added a way to let potential customers find out how much they could expect to save annually if they were to replace their current HVAC system with a heat pump. We don’t mean in generic terms like, “save up to $2,000” a year, which might not apply to their home’s situation. Instead, we want to give them an accurate estimate of the savings for their specific home type.
How might we do this? This is where the REM API comes in. We’ll use it to enable the Electrification Nation website to look more like this:
Now someone at the top of the funnel can type in their address, and see results in a few seconds. The results look like this:
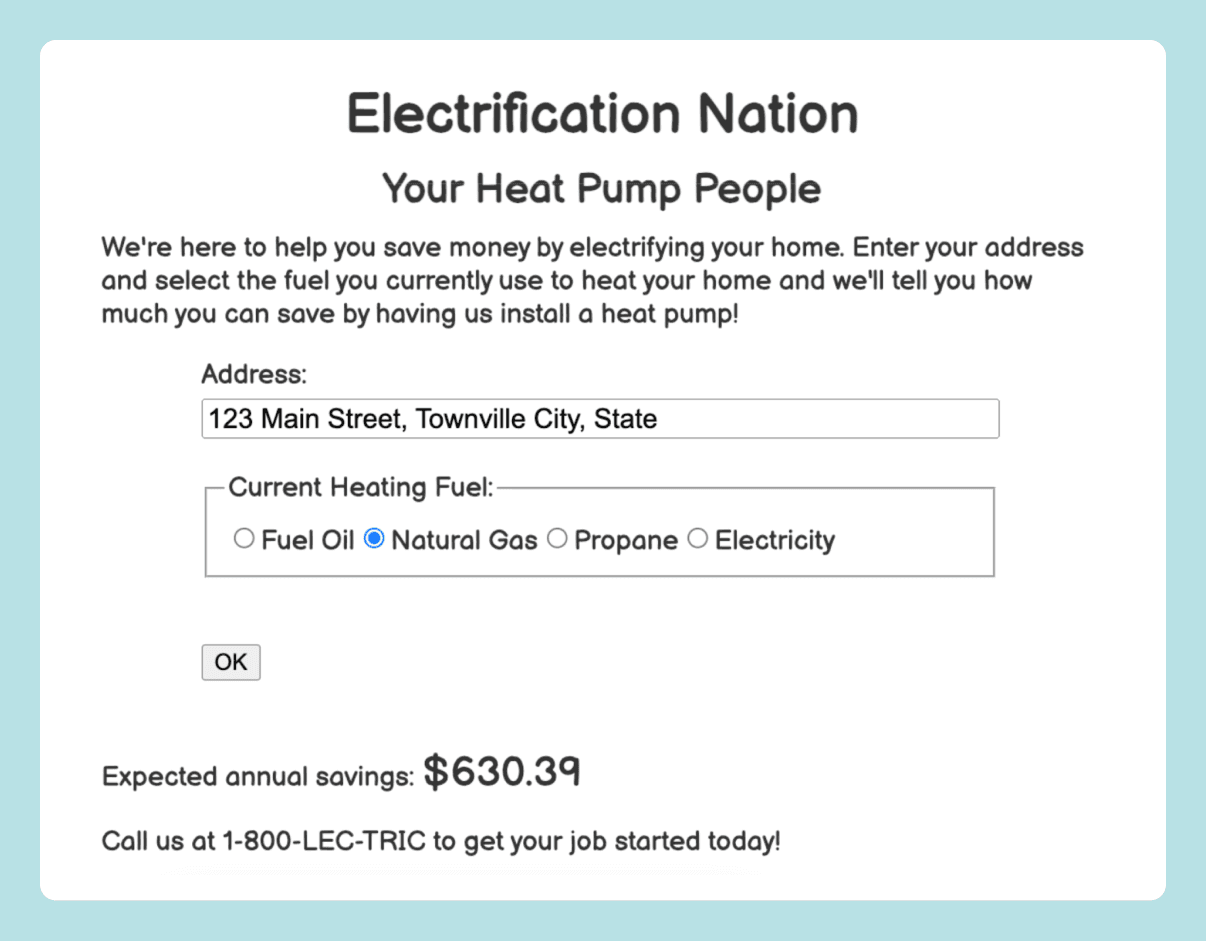
Now the potential customer is more engaged. The new interactive website is likely to generate more calls than the old static one, and give Electrification Nation more clues on where to focus additional marketing efforts. This is something that is more personalized, and promises more immediate feedback — helping engage customers to take the next step in the process more quickly and easily.
Adding a personalized call to action
Let’s dig into the technical details of how we can transform the static site into an interactive one. We’ll use raw HTML, CSS, and JavaScript to keep it simple and show the most basic form of calling the REM API from a web page.
In later posts we will move on to use frameworks like React and Next.js, which are more modern tools that offer some additional advantages. If you prefer to see the whole thing at once, it is available on GitHub. The code for the Electrification Nation website pre-personalization can be found at index-old.html. The code for the Electrification Nation website after we add in the API code is in index.html. Note that you don’t need any server side at all. You can just open these files in your favorite browser and get the full experience.
Getting back to the details: The beginning of our new index.html page looks very similar to the static one in index-old.html. We start with a short <head> section:
<!DOCTYPE html> <html lang="en"> <head> <link href='https://fonts.googleapis.com/css?family=Balsamiq Sans' rel='stylesheet'> <link rel="stylesheet" href="./css/demo.css"> <title>Electrification Nation</title> </head>
First, we link the Balsamiq Sans font, which gives us the wireframe look and feel. Next we include a CSS style sheet to format some of the elements. We won’t go through the styles in detail here. You can look at them if you like, but there is nothing fancy going on. Finally, we give the page a title. That’s it.
Now on to the body. The first thing in the body is a <script> tag, which we will come back to shortly. After that is the HTML for the page itself, which looks like this:
<div id="titlebar"> <h1 id="title"> Electrification Nation </h1> <h2 id="subtitle">Your Heat Pump People</h2> </div> <div id="content"> <div> We're here to help you save money by electrifying your home. Enter your address and select the fuel you currently use to heat your home and we'll tell you how much you can save by having us install a heat pump! </div> <div id="mainform"> <p>Address:</p><input name="address" id="address"></input> <p>Current Heating Fuel:</p> <input type="radio" name="fuel" id="fueloil" value="fuel_oil"><label for="fueloil">Fuel Oil</label> <input type="radio" name="fuel" id="natgas" value="natural_gas" checked="true"><label for="natgas">Natural Gas</label> <input type="radio" name="fuel" id="propane" value="propane"><label for="propane">Propane</label> <input type="radio" name="fuel" id="electric" value="electricity"><label for="electric">Electricity</label><br/><br/> <button id="ok" onclick="callApi()">OK</button> </div> <div id="results" hidden="True"> <p>Expected annual savings: <span id="savings">...</span></p> <p>Call us at 1-800-LEC-TRIC to get your job started today!</p> </div> </div>
Most of the elements here are exactly what you would expect from looking at the website. There is a <div> for the title bar and another for the content. Their ids match rules in our CSS file to style them. Then there is a form inside the <div id=”mainform”> tag. The address field, radio buttons for fuel type, and OK button are again what we expect to see. But there is one hidden element, the <div id=”results”> tag, which is initially hidden. This is where the savings number will go once the API computes it.
Handling form submissions
The onclick action for the API is a JavaScript function called callApi, which is literally where all the action is. It does several things:
Disables the OK button while the call is processed
Gathers the inputs the user has provided
Calls the REM API
Puts the estimated savings number back on the page for the user to see
Re-enables the OK button so they can try a different address
Let’s take a look at the code:
function callApi() { // Call the API using arguments taken from the form, // then populate the DOM based on the results. document.getElementById("ok").innerText = "Working..."; document.getElementById("ok").disabled = true; document.getElementById("results").hidden = true; const address = document.getElementById("address").value; const fuel = document.querySelector('input[name="fuel"]:checked').value; const base_url = "https://api.rewiringamerica.org/api/v1/rem/address" const url = encodeURI(base_url + "?upgrade=hvac__heat_pump_seer24_hspf13&address=" + address + "&heating_fuel=" + fuel) const options = {method: 'GET', accept: "application/json", headers: {Authorization: "Bearer " + api_key}}; console.log("Fetching " + url) console.log("with options: " + options) fetch(url, options) .then( function(response) { console.log("HTTP status: " + response.status); if (!response.ok) { throw new Error("HTTP status " + response.status); } return response.json(); } ) .then(updateResults) .catch(err => console.error(err)); }
Lines 4-6 adjust the display before we start. Lines 7 and 8 get the address and fuel type from the form. Lines 9-11 construct the URL we will use to call the API. In addition to the two arguments from the form, we add a third argument upgrade= which we use to specify a high-efficiency heat pump with electric backup. There are other options of efficiency upgrades — such as weatherization, weatherization plus high-efficiency heat pump installation, and whole-home electrification, which you can see in the REM API documentation. While we could expose all upgrade options to the user like we did for current heating fuel, it might be overwhelming or unnecessary in this scenario. For example, an average HVAC company such as Electrification Nation might only choose to display the most common type of heat pump system they install in the area they serve, and wait to discuss more nuanced options on a follow-up call with the customer.
The remainder of the code uses fetch to actually make the call. Line 21 verifies we got a good response. Line 24 pulls out the JSON from the response, and then we call a function called updateResults to update the results.
Before we go look at updateResults, there is one more thing we should look at. In line 11 we reference a variable called api_key. This was set up way back at the top of our <script> before the callApi function. It looks like this:
// If you don't have an API key, please register at // https://rewiring.link/api-signup to get one. const api_key = "INSERT_YOUR_API_KEY_HERE"
If you don’t already have an API key and want to try this out, visit https://docs.rewiringamerica.org/introduction and click “sign up” to get an account.
Now we can get to the final step, which is to update the page with the value that comes back from the API. That is in the updateResults function.
function updateResults(response) { // Update the results in the DOM. savings = -response.fuel_results.total.delta.cost.mean.value; document.getElementById("savings").textContent = savings.toLocaleString("en-US", {style:"currency", currency:"USD"}); document.getElementById("results").hidden = false; document.getElementById("ok").innerText = "OK"; document.getElementById("ok").disabled = false; }
One thing to note, which you can read more about in the REM API documentation, is that the API returns a lot of information about how the upgrade affects the use of various fuels, their costs, and the associated emissions. For the purposes of this web page, we only want one of those numbers: the mean change in total annual cost. That’s what we get when we dig down to response.fuel_results.total.delta.cost.mean.value. We change the sign because we want savings, not change in cost, which is negative when the user saves.
The rest of the function formats this number, puts it back in the results section of the DOM, and makes it visible. It then puts the OK button back to its original state.
Conclusions
What we showed here is that there is a simple, straightforward way to incorporate responsive, interactive data on the benefits of electrification to those considering it for their homes.
Our next post will explore how to integrate REM API calls into more modern web frameworks like React and Next.js that are popular today.
If you have questions, comments, suggestions, or if you find a bug in any of the code above, please start a discussion or open an issue in the https://github.com/rewiringamerica/api_demos GitHub repository where it is hosted. You can also find additional examples of how to use the Rewiring America API in that project.
Check out our other guides on using the Rewiring America API